
This guide explains how to remove Creative Cloud Files Shortcut from File Explorer in Windows 11 while preserving the local folder and installed Adobe applications.
The Creative Cloud Files entry can remain in the File Explorer navigation pane even when you no longer use Creative Cloud file syncing. You can hide the shortcut without deleting your local files or uninstalling Adobe apps.
Before you start: Editing the Windows Registry incorrectly can cause system problems. Sign in to the affected Windows account, create a restore point, and export any registry key before changing or deleting it.
Method 1: Unpin Creative Cloud Files
This is the preferred method because it changes a single value and is easy to reverse.
- Press Windows + R, type
regedit, and press Enter. Approve the User Account Control prompt. - In Registry Editor, go to:
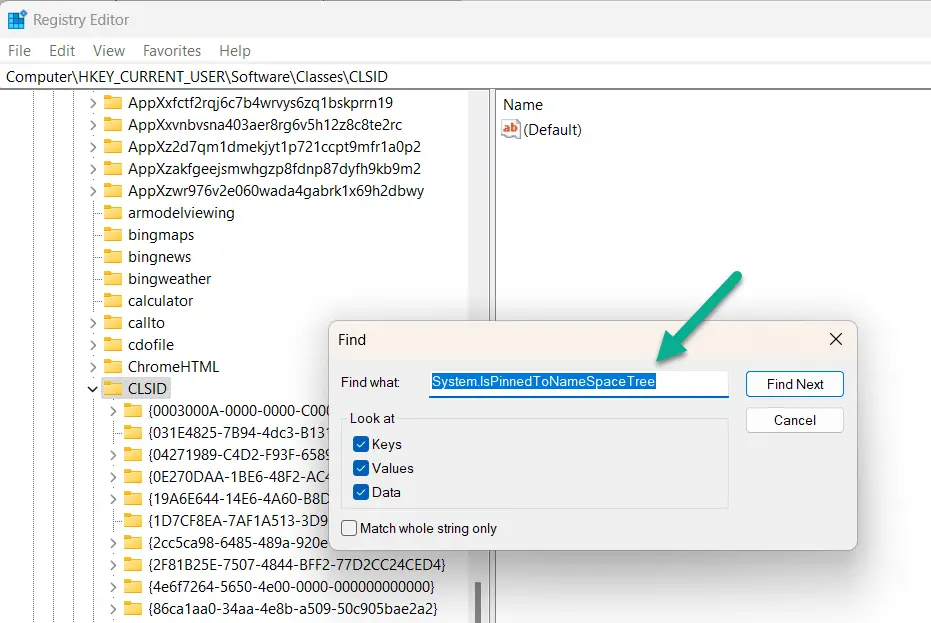
ComputerHKEY_CURRENT_USERSOFTWAREClassesCLSID - Select CLSID, then choose Edit > Find and search for
System.IsPinnedToNameSpaceTree. - Check the matching key's default value or other strings until you find the entry associated with Creative Cloud Files. Do not change an unrelated namespace entry.
- Right-click the matching key and select Export to save a backup.
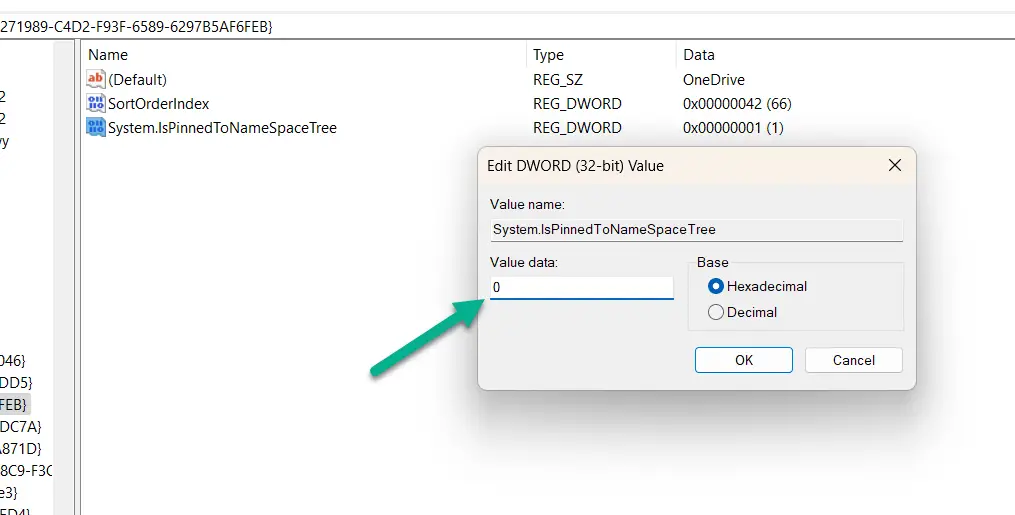
- Double-click
System.IsPinnedToNameSpaceTreeand change its value data from1to0.
Restart File Explorer
- Press Ctrl + Shift + Esc to open Task Manager.
- Find Windows Explorer on the Processes tab.
- Right-click it and choose Restart.
Open a new File Explorer window and confirm that the Creative Cloud Files shortcut has disappeared. If it is still visible, sign out of Windows and sign back in before trying the fallback method.
Method 2: Remove the per-user namespace entry
Use this fallback only if Method 1 does not work. Creative Cloud versions can create a per-user namespace key with an identifier that varies between installations.
- In Registry Editor, go to:
HKEY_CURRENT_USERSoftwareMicrosoftWindowsCurrentVersionExplorerDesktopNameSpace - Look for a subkey whose name starts with
0E270DAA-1BE6-48F2-AC49and whose default value identifies Creative Cloud Files. Verify both details before continuing; the remaining characters may differ. - Right-click that specific subkey, choose Export, and save the
.regbackup. - Delete only the verified Creative Cloud Files subkey.
- Restart Windows Explorer using the steps above.
How to undo the change
For Method 1, change System.IsPinnedToNameSpaceTree back to 1. For Method 2, double-click the exported .reg file and approve the import. Restart Windows Explorer afterward.
Note: This procedure only removes the navigation-pane shortcut. It does not delete the Creative Cloud Files folder or its contents, stop Adobe background services, or uninstall the Creative Cloud desktop app. An Adobe update may recreate the shortcut, in which case you can repeat the applicable method.
Before removing or relocating local content, review Adobe's Creative Cloud Synced Files information.
Comments