For years I had the big question asked: how do you build a lab environment at home? Do you need huge, noisy servers or specific equipment to build out a test lab, having multiple servers on multiple networks?
For example you want a full Microsoft Exchange mail service, with a domain controller and separate mailbox and client edge transport server to practice how these work together? Or build a multi-subnet environment to test how Active Directory sites are working?
Good news:
To build a basic IT server lab all you need is a home PC or laptop with 16 - 32GB or RAM and a working Windows installation on the computer and you are good to go!
Please note that the following guide is describing how to build a full home lab on a Windows host machine. If you want a little more powerful setup check out this page to learn how to set up Proxmox on a computer. This gives you a little more tools in your hands when it comes to configurability and efficiency.
For now let's see how to build a basic Windows hypervisor!
Steps:
- Install the Hyper-V package on your Windows computer
- Configure multiple subnets (optional)
- Install your new virtual machines (do not exceed your physical RAM)
Careful with RAM!
Make sure the cumulative allocated RAM of the virtual machines running at a particular time does not exceed the physical RAM of your computer.
For instance, if your computer has 16GB of RAM, leave 4GB overhead for your physical machine, to be on the safe side. That leaves 12GB of usable memory for the virtual boxes.
So for instance you can install a domain controller server with 4GB allocated RAM, and also an Exchange server that gets 8GB.
Install the Hyper-V package on your Windows computer
Make sure the Hyper-V hypervisor software package is installed on your computer. Although it's a part of the Windows system it is not installed by default.
First, open a Run text box ( Windows key + R), type in appwiz.cpl and hit Enter.
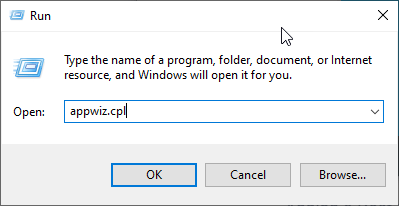
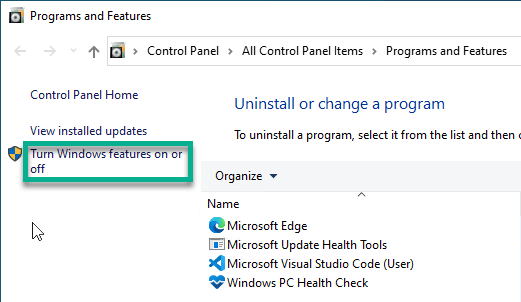
In the left side menu click on "Turn Windows features on or off"
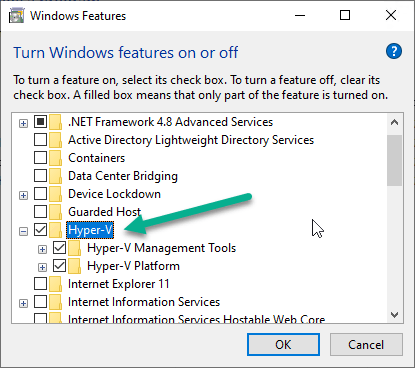
Scroll down to locate the Hyper-V feature, and check its box. Make sure all suboptions are selected before you hit OK.
When down, restart your computer!
Configure multiple subnets (optional)
I personally like to create one single subnet for my virtual machines, keeping the virtual environment somewhat separated from my home network. Or on many occasions, I prefer having multiple subnets, this way I can simulate a multi-site network setup.
You might skip this step if networking is none of your concern and you only need some virtual machines with an internet connection, not separated from your original home LAN. In that case, just jump to the next step.
For this lab I create two separate subnets with internet connectivity and proper routing in between them. The subnets are:
Subnet 1: 10.0.1.0/24
Subnet 2: 10.0.2.0/24
Set up virtual switches in Hyper-V for each subnet
Open the Hyper-V Manager console: you can find it either the Windows Administrative Tools folder in your Start menu, or you use the virtmgmt.msc shortcut (put it in Run) which is my preferred method 🙂
In that console, you'll see the name of your computer appear under the Hyper-V Manager container in the left side menu. In my case, the hostname of my computer is HYPER-V as seen in the illustration below.
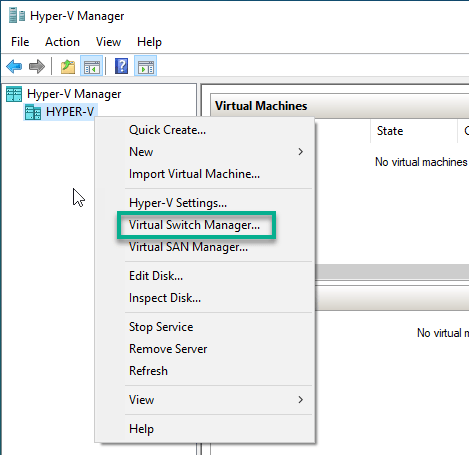
Right-click on you hostname, then select the "Virtual Switch Manager..." option.
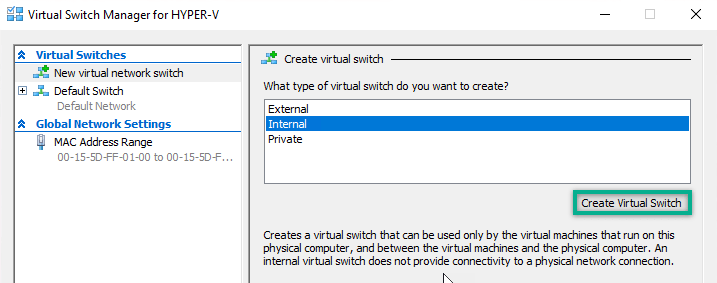
Select the New virtual network switch option, make sure the type is Internal and hit the Create Virtual Switch button.
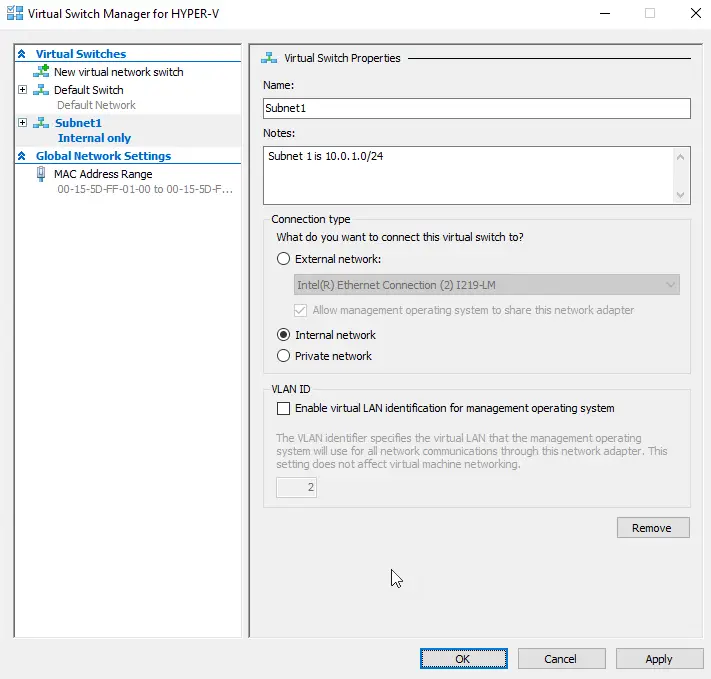
Name is Subnet1, type is Internal network. We don't need a VLAN ID for this switch so just leave the rest as is and click OK.
Repeat the process for Subnet 2.
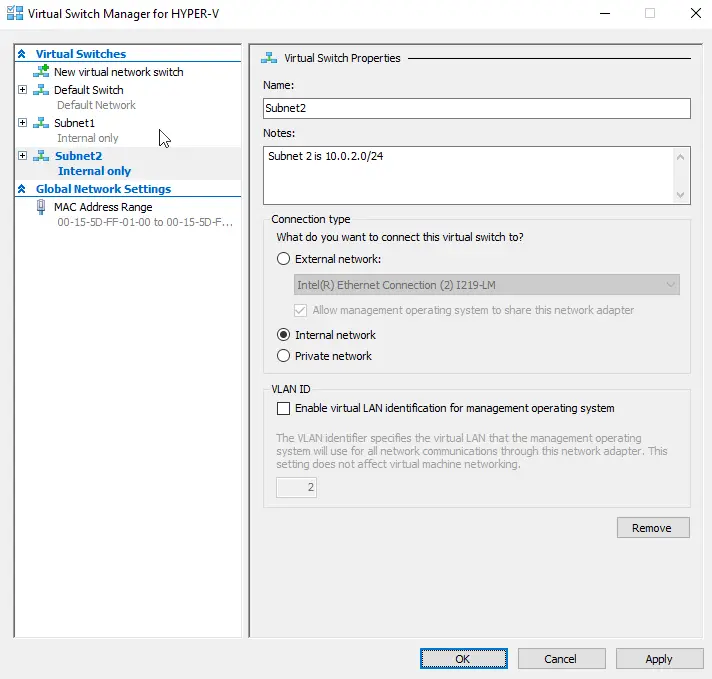
Configure the IP addresses for the virtual switches
Next, we need to set the IP addresses for the respective switches. Open up the list of the network interfaces on the machine: open the Run text box (Win key + R, or right-click on the Start button and hit Run), type in ncpa.cpl and hit Enter.

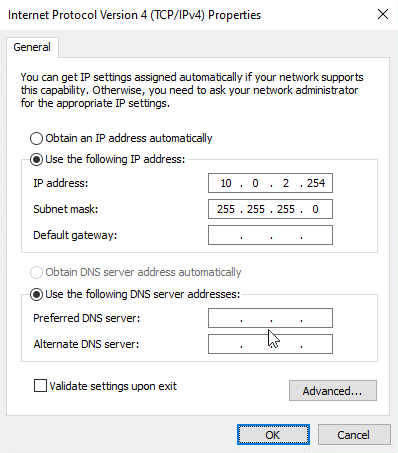
Right-click on vEthernet (Subnet 1), select Properties, highlight Internet Protocol Version 4 and click on the Properties button again.
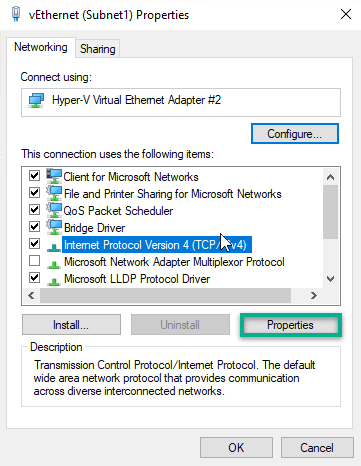
Select the Use the following IP address option and put in IP address 10.0.1.254 with subnet mask 255.255.255.0 . Hit OK, then close the properties window of the virtual switch.
Repeat the process with the Subnet2 interface, use IP 10.0.2.254 with subnet mask 255.255.255.0 .
Set up routing and add NAT rules
The last step of configuration is to enable routing in the Windows host and adding NAT rules to the machine.
Routing will help the virtual machines in different subnets to reach each other, for instance machines in Subnet1 to communicate with Subnet2 hosts.
NAT gives the virtual hosts Internet connection. Your home router is not aware of the new subnets and hance it has no routes back to them in case they started to reach out to an external network. With NAT enabled, your host Windows computer will proxy external network requests oh behalf of the new subnets.
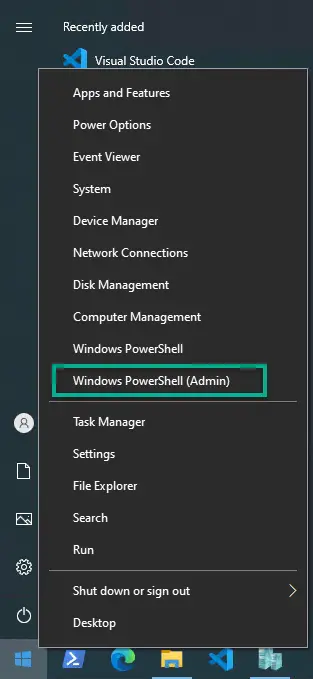
Open up an elevated PowerShell window. Right-click on the Windows button, the select Windows PowerShell (Admin)
Set Routing
The following command sets a unique registry value, enabling ip routing on the Windows host. Note that a reboot is required after the value set.
Set-ItemProperty -Path "HKLM:\SYSTEM\CurrentControlSet\Services\Tcpip\Parameters\" -Name IpEnableRouter -Value 1
Add NAT rules
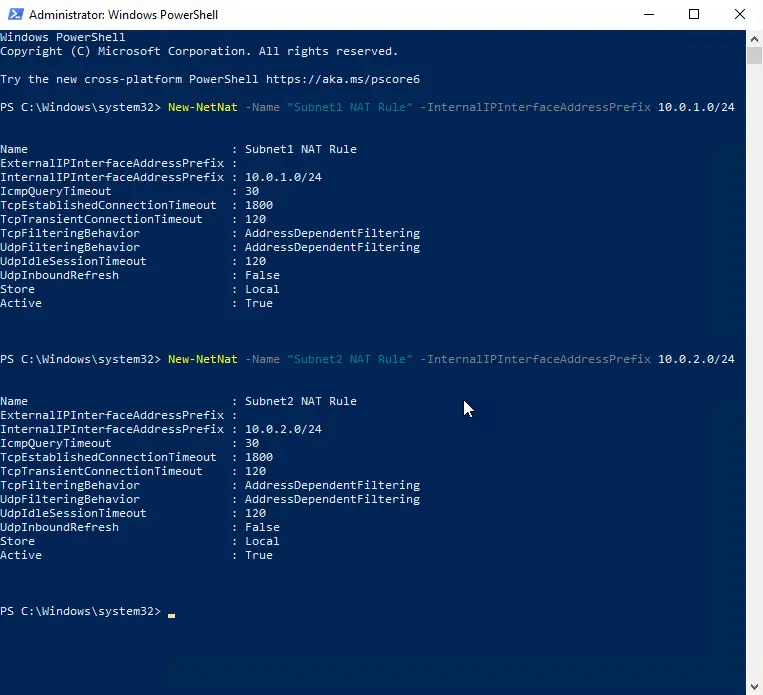
Next, we set up the NAT rules for each of our subnets. Type in the following commands, hit Enter after each one.
New-NetNat -Name "Subnet1 NAT Rule" -InternalIPInterfaceAddressPrefix 10.0.1.0/24
New-NetNat -Name "Subnet2 NAT Rule" -InternalIPInterfaceAddressPrefix 10.0.2.0/24
Reboot the computer!
Install your new virtual machines
The only thing left is to install two virtual machines on our hypervisor computer, one connected to each of the new virtual switches.
Open the Hyper-V Manager console. Either find it in the Start menu under the Windows Administrative Tools, or use the virtmgmt.msc command to open it up.
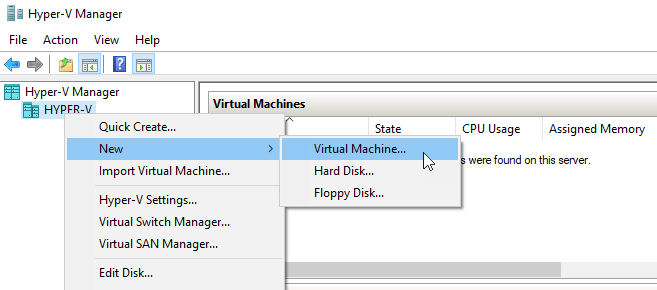
Right-click on your computer's hostname in the left side menu (again, it's HYPER-V in my case), then select New and Virtual Machine...
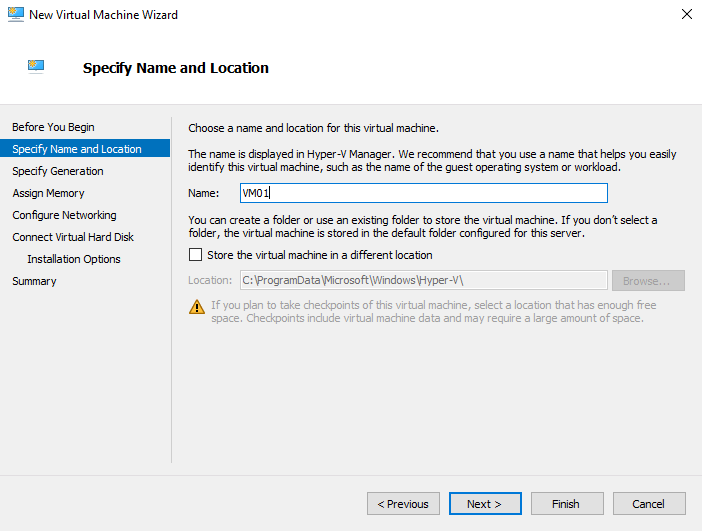
The name is VM01 and we leave the location as it is.
The configuration files along with the new virtual disks will be created here, so although the disk will dynamically expand as new data is written on it, if you'd run out of disk space and have a different physical drive to use, feel free to change the location to that.
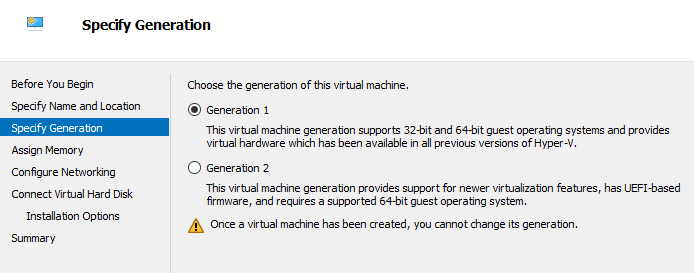
Generation is Generation 1.
For compatibility that's the preferred type and we'd not be using the additional functionality of Gen 2 virtual machines anyway.
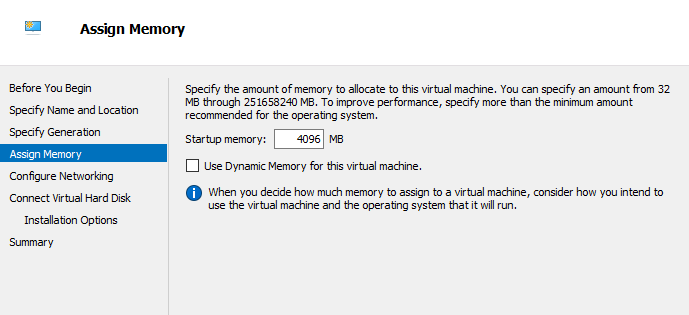
We assign 4GB (or 4096MB) of RAM to the machine, and uncheck the dynamic memory allocation option.
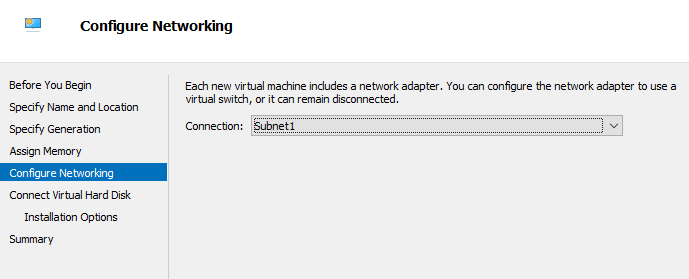
Set the network adapter to connect to the Subnet1 virtual switch
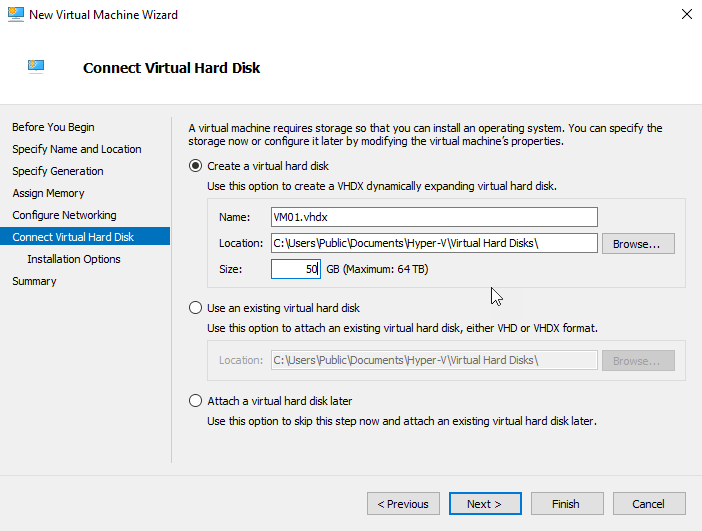
On the next window set the size to 50GB. We don't plan to put so much data on the new virtual machines so that space will be more that enough for a basic Windows system.
Again, it's a dynamically expanding disk so it will use up just as much space on the physical disk as it's used on the virtual drive, meaning the size is much less than the allocated 50GB. It will grow as the virtual machine grows. Furthermore, the virtual drive is expandable in case we needed it to be bigger in the future.
To install Windows Server 2016 on the new virtual machine, download the installer from Microsoft (it's fully available and working as a trial version for 180 days after installation):
Download Windows 2016 ISO
Then, under the Installation Options use this downloaded ISO to load in the virtual DVD-ROM.
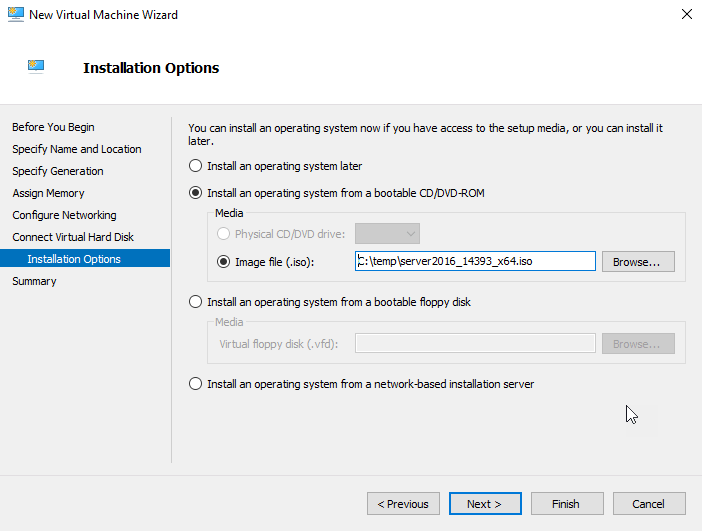
Click on Finish.
Before starting the virtual machine, we make two changes:
a. Allocate more CPU cores to it
b. Disable auto checkpoints.
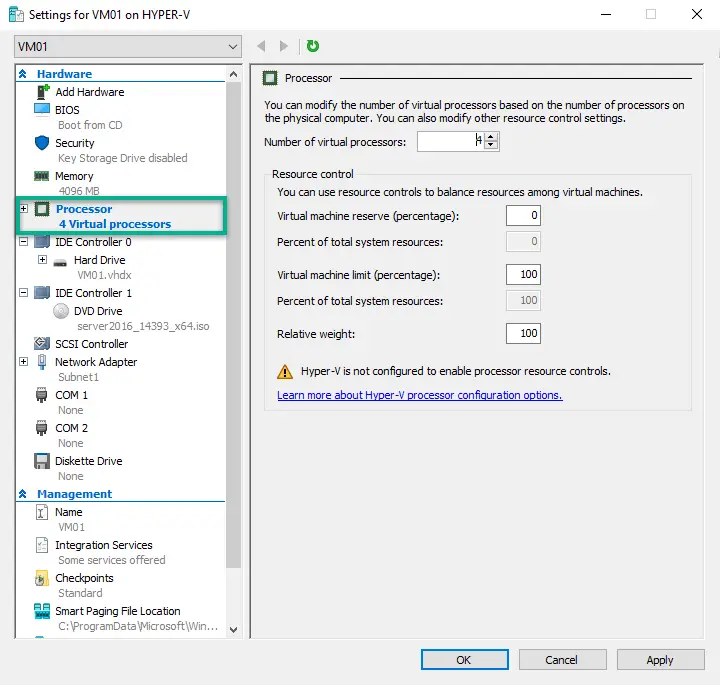
To allocate more CPUs right-click on the new VM (VM01), select Settings...
There under Processor set the virtual processor count to 4. Don't worry if your physical machine also only have four cores, the hypervisor will allocate resources automatically. You don't need to worry about "overbooking" processor resources.
However this is not true to memory! With memory allocation you have to be careful, the cummulative allocated memory of all running vitual machines must not exclude the physical memory of your computer!
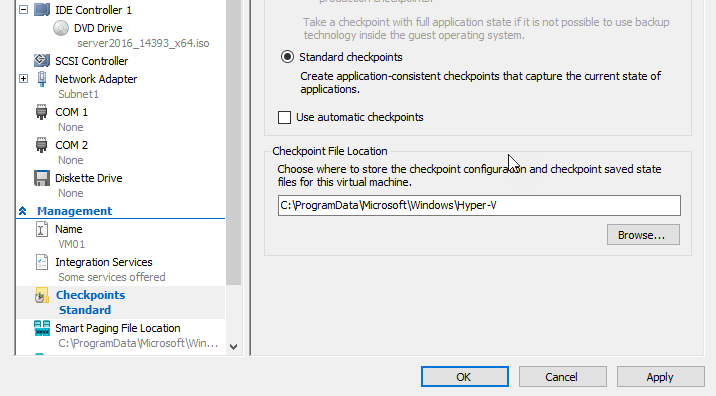
Now navigate to Checkpoints and uncheck the Use automatic checkpoints box. Checkpoints are snapshots of the virtual machine to preserve an exact state of them when needed at any time. You can roll back the virtual machine to these snapshots, getting back the configuration and even all the files how they were that time.
Now install Windows on the server just like you normally do on a physical machine. Right-click on it, hit the Start option, then Connect to see it in a console and control the vm.
One hint is that you want to install Windows with the Desktop Experience option. Otherwise you'll only have a single command prompt available on the virtual box that will make it much harder to administer.
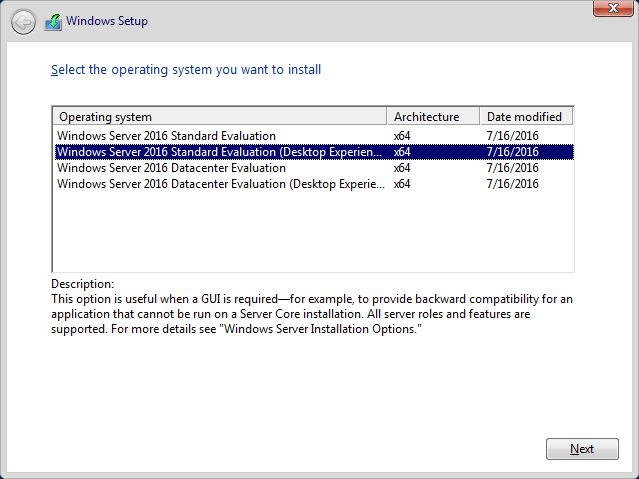
I skip over this step, jumping to the running, fully installed virtual machine.
When VM01 is up and running, set up networking. To do this we simply need to assign an IP address to the box.
Open the Run box (Win Key + R), then type in ncpa.cpl and hit Enter.
Right-click on the network interface called Ethernet, and choose Properties. There, select the Internet protocol Version 4 and hit Properties again. I don't include shcreenshots, because it's the exact same procedure we went through when setting the IP address for the virtual switches.
Set the IP address to 10.0.1.1, with subnet mask 255.255.255.0.
Default gateway is the IP of the virtual switch (Subnet1): 10.0.1.254
DNS server can either be the famous Google DNS server on IP 8.8.8.8 or 8.8.4.4, or Cloudflare on 1.1.1.1
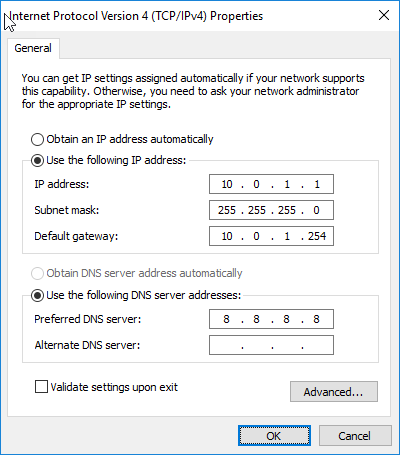
Repeat the whole process on VM02!
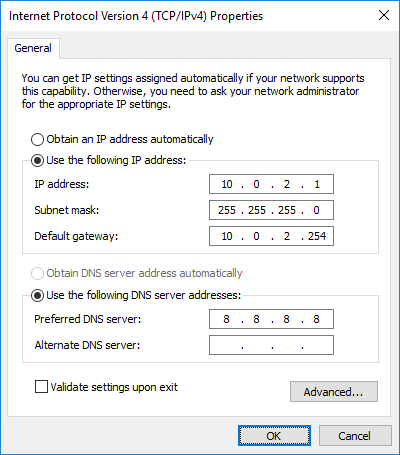
VM02:
IP: 10.0.2.1, subnet mask 255.255.255.0
Gefault gateway: 10.0.2.254
DNS: 8.8.8.8 or 8.8.4.4 or 1.1.1.1
Test
To test connectivity open a command line window on VM01. Open a Run box, type in cmd and hit Enter.
Disable the firewall that blocks ICMP echo (ping) packages by default. Run the following in the cmd window:
netsh advfirewall set allprofiles state off
Now, ping VM02 (10.0.2.1) from VM01 (10.0.1.1). Also we can test vice-versa. If we did everything correctly we should receive answers back form the pinged machine!
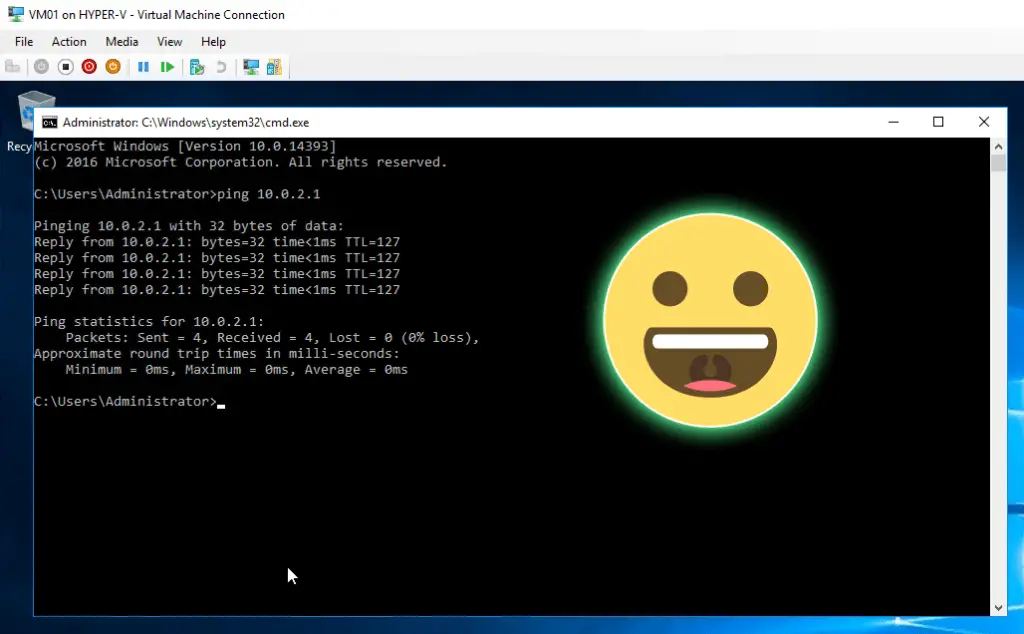
Voila! 🙂

Comments