• Skip to primary navigation
  • Skip to main content
  • Skip to primary sidebar
  • Skip to secondary sidebar
OpenTechTips

OpenTechTips

Comprehensive IT Guides for Pros and Enthusiasts

MENUMENU
  • HOME
  • ALL TOPICS
    • Exchange
    • InfoSec
    • Linux
    • Networking
    • Scripting
      • PowerShell
    • SSL
    • Tools
    • Virtualization
    • Web
    • Windows
  • ABOUT
  • SUBSCRIBE
Home » How to Add a Thin-Provisioned Disk in Proxmox

How to Add a Thin-Provisioned Disk in Proxmox

March 29, 2022 - by Zsolt Agoston - last edited on March 29, 2022

Storage Matters!

Note that this guide only applies to virtual disk files in Qemu image format (qcow2)!

After creating a new virtual machine in Proxmox or KVM, the disk we virtual created for the machine uses up as much space as we set during provisioning.

This means a 50GB large virtual disk will sit in our filesystem, using up 50GB space.

As we likely not use that much disk space on the VM, it would be wise to use only that much scape the virtual machine actually occupies on its virtual disk. This means a fresh basic Windows installation only uses up around 20GB space, so our virtual drive will start its life with a nearly 0 size, then expands as more and more data is written on it (max 50GB as that's the provisioned size).

This process is called thin-provisioning.

To accomplish this on Proxmox we use the command line. Don't worry, it's gong to be very simple.

Recreate Disk as Thin-Provisioned

As usual we follow through an example scenario to see how this thin-provisioning happens in practice.

1. First, create a new VM in Proxmox called NewVM. Don't start it up just yet!

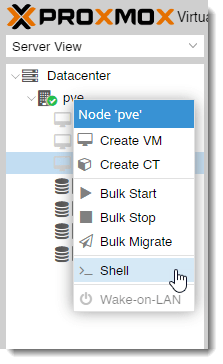
2. Open a shell to Proxmox. Right-click on the Proxmox hostname in the WebUI and select Shell.

How to Add a Thin-Provisioned Disk in Proxmox

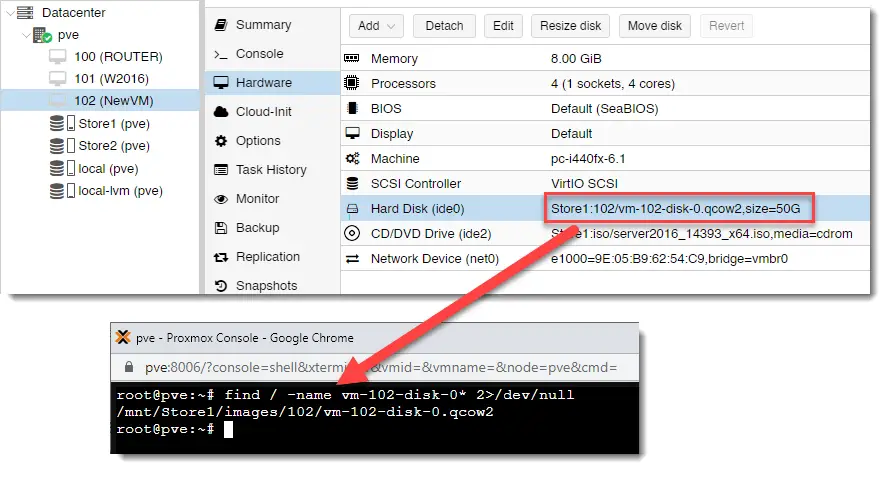
3. Locate the disk file in the shell. You can find the name of the virtual disk on the Hardware tab of your VM, then use find to get the location.

find / -name [disk name]* 2>/dev/null
How to Add a Thin-Provisioned Disk in Proxmox

4. Jump to the containing folder, and there use the qemu-img command to re-create the same disk with thin-provisioning logic.

# Re-create image
qemu-img create -f qcow2 [file name.qcow2] [disk size]

# Example
qemu-img create -f qcow2 vm-102-disk-0.qcow2 50G
How to Add a Thin-Provisioned Disk in Proxmox

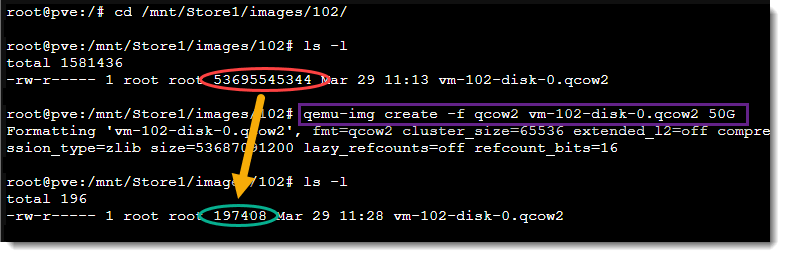
The actual size the virtual disk uses is less than 200kb after the re-creation process!

Power up your VM and enjoy!

Reader Interactions

Comments Cancel reply

Your email address will not be published. Required fields are marked *

Primary Sidebar

Tools

Secondary Sidebar

CONTENTS

  • Storage Matters!
  • Recreate Disk as Thin-Provisioned

  • Terms of Use
  • Disclaimer
  • Privacy Policy
Manage your privacy

To provide the best experiences, we and our partners use technologies like cookies to store and/or access device information. Consenting to these technologies will allow us and our partners to process personal data such as browsing behavior or unique IDs on this site and show (non-) personalized ads. Not consenting or withdrawing consent, may adversely affect certain features and functions.

Click below to consent to the above or make granular choices. Your choices will be applied to this site only. You can change your settings at any time, including withdrawing your consent, by using the toggles on the Cookie Policy, or by clicking on the manage consent button at the bottom of the screen.

Functional Always active
The technical storage or access is strictly necessary for the legitimate purpose of enabling the use of a specific service explicitly requested by the subscriber or user, or for the sole purpose of carrying out the transmission of a communication over an electronic communications network.
Preferences
The technical storage or access is necessary for the legitimate purpose of storing preferences that are not requested by the subscriber or user.
Statistics
The technical storage or access that is used exclusively for statistical purposes. The technical storage or access that is used exclusively for anonymous statistical purposes. Without a subpoena, voluntary compliance on the part of your Internet Service Provider, or additional records from a third party, information stored or retrieved for this purpose alone cannot usually be used to identify you.
Marketing
The technical storage or access is required to create user profiles to send advertising, or to track the user on a website or across several websites for similar marketing purposes.
Statistics

Marketing

Features
Always active

Always active
Manage options Manage services Manage {vendor_count} vendors Read more about these purposes
Manage options
{title} {title} {title}
Manage your privacy
To provide the best experiences, we use technologies like cookies to store and/or access device information. Consenting to these technologies will allow us to process data such as browsing behavior or unique IDs on this site. Not consenting or withdrawing consent, may adversely affect certain features and functions.
Functional Always active
The technical storage or access is strictly necessary for the legitimate purpose of enabling the use of a specific service explicitly requested by the subscriber or user, or for the sole purpose of carrying out the transmission of a communication over an electronic communications network.
Preferences
The technical storage or access is necessary for the legitimate purpose of storing preferences that are not requested by the subscriber or user.
Statistics
The technical storage or access that is used exclusively for statistical purposes. The technical storage or access that is used exclusively for anonymous statistical purposes. Without a subpoena, voluntary compliance on the part of your Internet Service Provider, or additional records from a third party, information stored or retrieved for this purpose alone cannot usually be used to identify you.
Marketing
The technical storage or access is required to create user profiles to send advertising, or to track the user on a website or across several websites for similar marketing purposes.
Statistics

Marketing

Features
Always active

Always active
Manage options Manage services Manage {vendor_count} vendors Read more about these purposes
Manage options
{title} {title} {title}