• Skip to primary navigation
  • Skip to main content
  • Skip to primary sidebar
  • Skip to secondary sidebar
OpenTechTips

OpenTechTips

Comprehensive IT Guides for Pros and Enthusiasts

MENUMENU
  • HOME
  • ALL TOPICS
    • Exchange
    • InfoSec
    • Linux
    • Networking
    • Scripting
      • PowerShell
    • SSL
    • Tools
    • Virtualization
    • Web
    • Windows
  • ABOUT
  • SUBSCRIBE
Home » Move maiboxes between on-prem Exchange systems with PowerShell

Move maiboxes between on-prem Exchange systems with PowerShell

August 17, 2020 - by Zsolt Agoston - last edited on September 26, 2020

An interesting test is how to migrate user mailboxes between two on-prem Exchange systems that have no connection whatsoever, other than a plain network connection through the internet. They belong to different forests, and there are no trust relationships set up between them. We use the same method we used with Office365 on- and offboarding, not suggesting to do this on production environments as this method is NOT supported by Microsoft.

But it works!

1. Our Goal

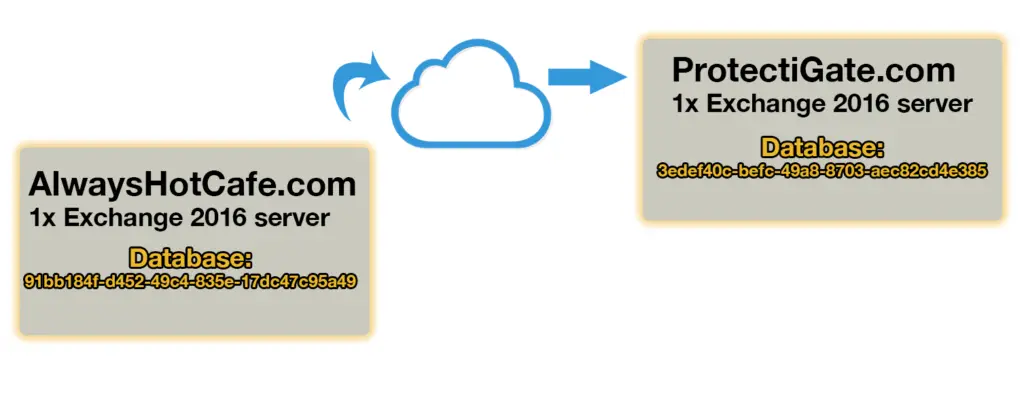
We have ten users in AlwaysHotCafe.com that we want to migrate to the ProtectiGate.com Exchange servers through the internet.

Move maiboxes between on-prem Exchange systems with PowerShell

2. Preparation

a. On the ProtectiGate DC we add the AlwaysHotCafe.com alternative UPN suffix. Open the AD Domains and Trusts snap-in, right click on the "Active Directory Domains and Trusts" option, and add the suffix there.

Move maiboxes between on-prem Exchange systems with PowerShell

b. Add the AlwaysHotCafe.com as an internal relay to the Exchange system, also in the ProtectiGate.com domain.

PS C:\> New-AcceptedDomain -Name "AlwaysHotCafe.com" -DomainName "AlwaysHotCafe.com" -DomainType InternalRelay

c. Export users from the AlwaysHotCafe DC to recreate them in the destination domain.

$UserToMove = @(
"Sammy Robertson"
"Milo Lang"
"Zoey Maldonado"
"Maia Ortega"
"Gary Berry"
"Rylie Freeman"
"Gaige Meyer"
"Cierra Morrow"
"Aaron Mullen"
"Alice"
)

$UserToMove | Get-Mailbox | select @{name="FirstName";expression={(Get-ADUser $_.SamAccountName).GivenName}},@{name="LastName";expression={(Get-ADUser $_.SamAccountName).SurName}},Name,DisplayName,UserPrincipalName,SamAccountName,WindowsEmailAddress,Alias,PrimarySmtpAddress,ExchangeGuid | Export-Csv Users.csv

d. Create the Users on the target domain controller (ProtectiGate.com) in a separate OU and add the necessary account properties to them

# Create New organizational unit to store the imported users
New-ADOrganizationalUnit -Name "AHC" -Path "DC=protectigate,DC=com" -Verbose

# Create Users
Import-Csv Users.csv | %{
	New-ADUser -Name $_.Name -DisplayName $_.DisplayName -GivenName $_.FirstName -Surname $_.LastName -UserPrincipalName $_.UserPrincipalName -SamAccountName $_.SamAccountName -Path "OU=AHC,DC=protectigate,DC=com" -Enabled:$true -EmailAddress $_.WindowsEmailAddress -AccountPassword(ConvertTo-SecureString "Password12345!" -AsPlainText -Force)
	Enable-RemoteMailbox -Identity $_.UserPrincipalName -RemoteRoutingAddress $_.UserPrincipalName
	Set-RemoteMailbox -Identity $_.UserPrincipalName -EmailAddressPolicyEnabled:$false
	Set-RemoteMailbox -Identity $_.UserPrincipalName -ExchangeGuid $_.ExchangeGuid -WindowsEmailAddress $_.WindowsEmailAddress -PrimarySmtpAddress $_.PrimarySmtpAddress
}

e. Create Migration Endpoint on the source (Al;waysHotCafe) Exchange server

#  Use the Protectigate admin credentials to form the endpoint
PS C:\> New-MigrationEndpoint -Name "Protectigate" -RemoteServer mail.protectigate.com -ExchangeRemoteMove -MaxConcurrentMigrations 50 -MaxConcurrentIncrementalSyncs 40 -Credentials $cr

3. Create Migration Batches

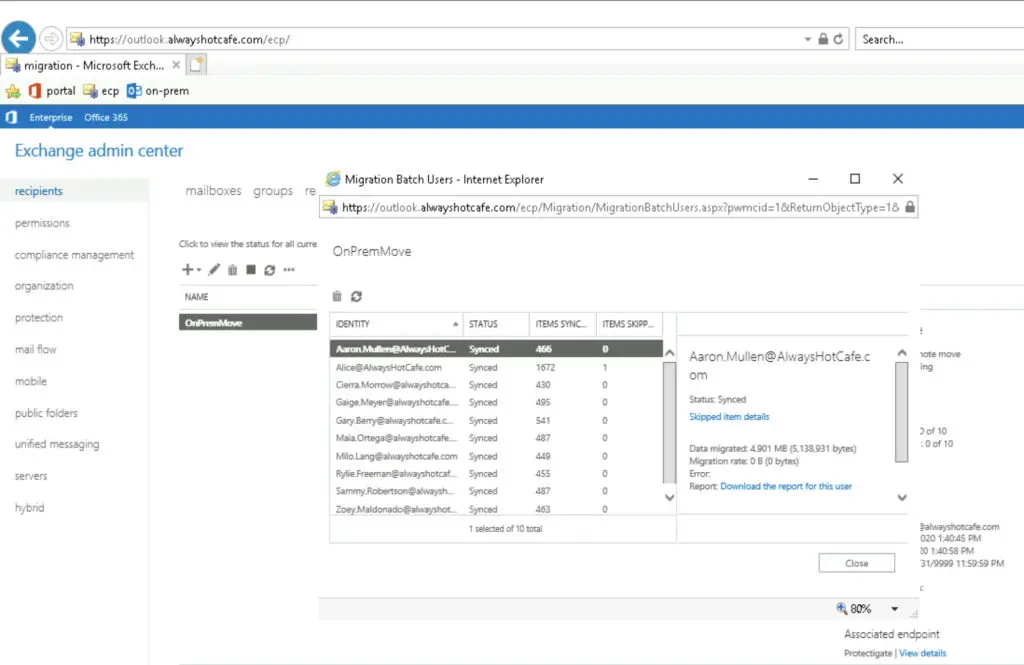
After preparing the target domain and creating the endpoint, we are ready to start syncing the selected user mailboxes.

First, create a CSV file with the ten mailboxes to migrate as below:

OnPremMove.csv

EmailAddress
Sammy.Robertson@alwayshotcafe.com
Milo.Lang@alwayshotcafe.com
Zoey.Maldonado@alwayshotcafe.com
Maia.Ortega@alwayshotcafe.com
Gary.Berry@alwayshotcafe.com
Rylie.Freeman@alwayshotcafe.com
Gaige.Meyer@alwayshotcafe.com
Cierra.Morrow@alwayshotcafe.com
Aaron.Mullen@AlwaysHotCafe.com
Alice@AlwaysHotCafe.com

On the AlwaysHotCafe server create the migration batch with the following cmdlet.

You can get the TargetDatabase GUID by running this command on the Exchange server of target domain:
Get-MailboxDatabase | Select Guid

#  Create batch
PS C:\> New-MigrationBatch -Name "OnPremMove" -TargetEndpoint "Protectigate" -CSVData ([System.IO.File]::ReadAllBytes("OnPremMove.csv")) -BadItemLimit 100 -LargeItemLimit 100 -TargetDeliveryDomain protectigate.com -TargetDatabases "3edef40c-befc-49a8-8703-aec82cd4e385"

#  Start the batch to sync the mailboxes
PS C:\> Start-MigrationBatch "OnPremMove"

4. Finish the Migration Batches

After the mailboxes are all synced and ready for completion, we finish the batch. If you need to complete only individual mailboxes, check out the guide here

Move maiboxes between on-prem Exchange systems with PowerShell

The process does a final sync to the target and removes the mailboxes from the source system.

# Complete the migration by finalizing the synced mailboxes
PS C:\> Complete-MigrationBatch "OnPremMove"

5. Verify the Mailboxes are Moved Successfully

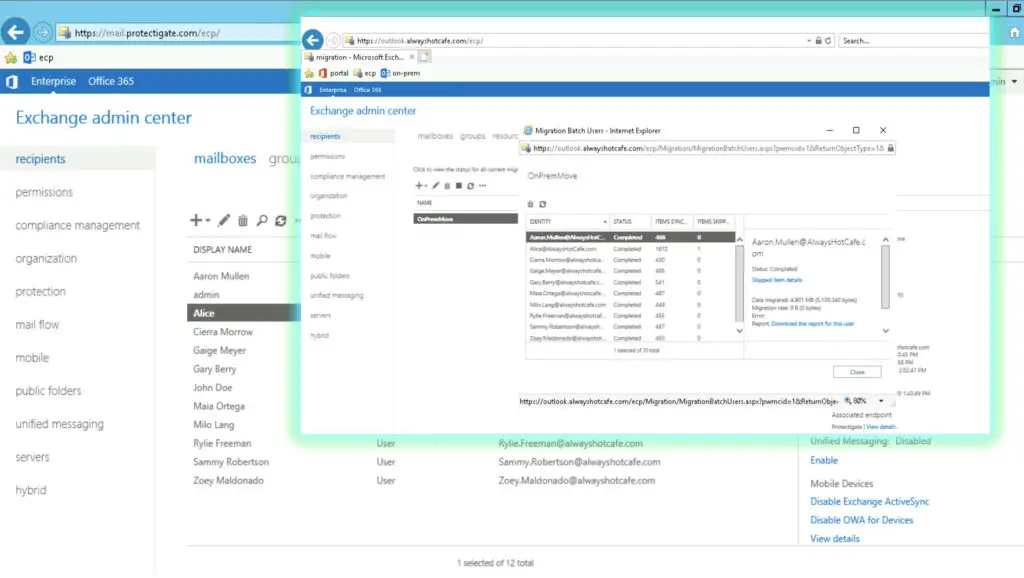
The migrated mailboxes disappeared from the source system and they appear in the ProtectiGate Exchange environment.

Move maiboxes between on-prem Exchange systems with PowerShell

Reader Interactions

Comments Cancel reply

Your email address will not be published. Required fields are marked *

Primary Sidebar

Tools

Secondary Sidebar

CONTENTS

  • 1. Our Goal
  • 2. Preparation
  • 3. Create Migration Batches
  • 4. Finish the Migration Batches
  • 5. Verify the Mailboxes are Moved Successfully

  • Terms of Use
  • Disclaimer
  • Privacy Policy
Manage your privacy

To provide the best experiences, we and our partners use technologies like cookies to store and/or access device information. Consenting to these technologies will allow us and our partners to process personal data such as browsing behavior or unique IDs on this site and show (non-) personalized ads. Not consenting or withdrawing consent, may adversely affect certain features and functions.

Click below to consent to the above or make granular choices. Your choices will be applied to this site only. You can change your settings at any time, including withdrawing your consent, by using the toggles on the Cookie Policy, or by clicking on the manage consent button at the bottom of the screen.

Functional Always active
The technical storage or access is strictly necessary for the legitimate purpose of enabling the use of a specific service explicitly requested by the subscriber or user, or for the sole purpose of carrying out the transmission of a communication over an electronic communications network.
Preferences
The technical storage or access is necessary for the legitimate purpose of storing preferences that are not requested by the subscriber or user.
Statistics
The technical storage or access that is used exclusively for statistical purposes. The technical storage or access that is used exclusively for anonymous statistical purposes. Without a subpoena, voluntary compliance on the part of your Internet Service Provider, or additional records from a third party, information stored or retrieved for this purpose alone cannot usually be used to identify you.
Marketing
The technical storage or access is required to create user profiles to send advertising, or to track the user on a website or across several websites for similar marketing purposes.
Statistics

Marketing

Features
Always active

Always active
Manage options Manage services Manage {vendor_count} vendors Read more about these purposes
Manage options
{title} {title} {title}
Manage your privacy
To provide the best experiences, we use technologies like cookies to store and/or access device information. Consenting to these technologies will allow us to process data such as browsing behavior or unique IDs on this site. Not consenting or withdrawing consent, may adversely affect certain features and functions.
Functional Always active
The technical storage or access is strictly necessary for the legitimate purpose of enabling the use of a specific service explicitly requested by the subscriber or user, or for the sole purpose of carrying out the transmission of a communication over an electronic communications network.
Preferences
The technical storage or access is necessary for the legitimate purpose of storing preferences that are not requested by the subscriber or user.
Statistics
The technical storage or access that is used exclusively for statistical purposes. The technical storage or access that is used exclusively for anonymous statistical purposes. Without a subpoena, voluntary compliance on the part of your Internet Service Provider, or additional records from a third party, information stored or retrieved for this purpose alone cannot usually be used to identify you.
Marketing
The technical storage or access is required to create user profiles to send advertising, or to track the user on a website or across several websites for similar marketing purposes.
Statistics

Marketing

Features
Always active

Always active
Manage options Manage services Manage {vendor_count} vendors Read more about these purposes
Manage options
{title} {title} {title}